Charlie Guide ENG
What's in the box?

- M3x20 nylon standoff
- M3x17 nylon standoff
- Battery holder
- M3x10 nylon screw
- M3x6 nylon screw
- M3x25 nylon screw
- M3x5 nylon standoff
- Antenna
- M3x12 metal screw flathead
- M3x30 nylon standoff
- Spacers
- Controller acrylic casings
- Charlie PCB
- M3x10 nylon standoff
- Batteries
- Custom molded small wheel
- Controller PCB
- M3x6 metal screw roundhead
- Motors
- Wheels
- Coin battery
- Transmitter
- Charlie acrylic casings
- Custom molded wheel shaft
- M3 nut
- LEDs
- Pushbuttons
- Token
- M3x10 nylon screw
- Receiver module
Welcome to the Charlie build guide!
Ready to build your very own Charlie robot? Follow
these fun and easy steps to bring Charlie to life!
First things first, let’s get your acrylic casings ready.

Carefully peel off the protective foil from both sides
of each casing so they are clear and shiny.

Wow, look how shiny they are now!
Now let’s dive into the
exciting assembly part!
The first components you’ll need are a battery holder, two
metal screws, four spacers and a casing from the photo.

Place the metal screws
into the slots within
the battery holder.

Next, position the battery
holder on the large casing,
making sure the wires
are directed toward the
pointy end of the casing.
Take two remaining
spacers and fasten the
battery holder to the
casing. This will ensure
that it stays secure.

Take the batteries and insert them into the battery holder.
Be careful to put the batteries in the right way. Inside the battery
holder, there are + and – signs indicating the correct polarity.
The same + and – signs can be found on each battery.

Now it’s time to connect the motors! Here are the parts you’ll need.

Lay out all the parts on
your table, like in the
photo. This will help you
keep track of everything
and avoid mistakes.
Take one of the motors
and a longer casing.
Attach the casing to the
side of the motor without
the wire. You’ll see that the
motor’s parts fit perfectly
into the casing’s cutouts.

Take the smaller casing
and attach it to the side
with the wire. It will fit
perfectly with the motor,
just like the other casing.

Take one long bolt and
insert it through both
casings and the motor.
Start from the side
with the longer casing
and push it through.

Attach a spacer to the side of the smaller casing
to securely hold everything together..

Repeat this step with the second spacer and bolt. Once you’re done,
everything will be securely in place. Here’s what it should look like:


Repeat the steps for the
second motor, ensuring
that the smaller casing is
on the side that has the
wire. This will give you two
symmetrical motors. Be
sure that the wired parts
are facing each other.

Now, it’s time to
connect the motors to
the battery holder.
Make sure the wires are
facing away from the
battery holder. Look
for the cutouts on the
casing where you can
fit the motor parts into
the battery holder.

Now, do the same for
the second motor.

Make sure everything is secure so nothing falls
out, even if you turn it upside down.

It’s time for some
creative fun!
The box contains stickers
that you can use to give
your Charlie a unique
look. Just remember to
place all the stickers on
the right side so Charlie
doesn’t end up inside out!


Before continuing the
assembly, we need to
pull all the motor wires
through the hole, just
like in the photo. This
way, they’ll be next to the
battery holder’s wire.

Now you can grab
these parts, and we’re
ready to start putting
everything together!

Grab this casing and
one of the bolts. Insert
the bolt through the
casing like this:

Take the spacer and fasten
the bolt from the backside:

Do the same thing on the other side, too.

You did it!
Now, grab these parts
to keep building:

Take the longer bolt
and insert it through
the casing like this,
starting from the side
with the motors.

Turn Charlie around, take
the smaller standoff, and
use it to secure the bolt.

Place the longest spacer
on top and tighten
everything together.

Take this casing and put
it on top of the spacer.

Finally, use the smaller bolt to tighten everything
together so nothing falls off.


Here’s what everything
should look like so far:

For the next step, you’ll
need these parts:

Add one of the bolts to the
side with the motors, next
to the hole with the wires.

Secure a bolt with the
smaller spacer, just like we
did in the previous step.

Place the longer
spacer on top.

Repeat this step with
the second bolt and
another set of spacers.

Place this casing on
top, making sure the
wires go through the
rectangular hole.

Now, let’s assemble
Charlie’s head.

First, place these two spacers into the spacers you just
added, which are still not connected to anything. Like this:


Next, add these parts:

Place one of the bolts
through the middle
of the head casing.

Fasten it with the long spacer on the back side.


Take the casing that looks
like a crown and place it
on top of Charlie’s head.

Place the two remaining bolts in those spots and secure
them on the backside with the two small spacers.


Take the PCB and connect all the wires to it. The labels
show where the battery and motors go. Connect the
motor from the left side to the Motor L connector, and the
motor from the right side to the Motor R connector.
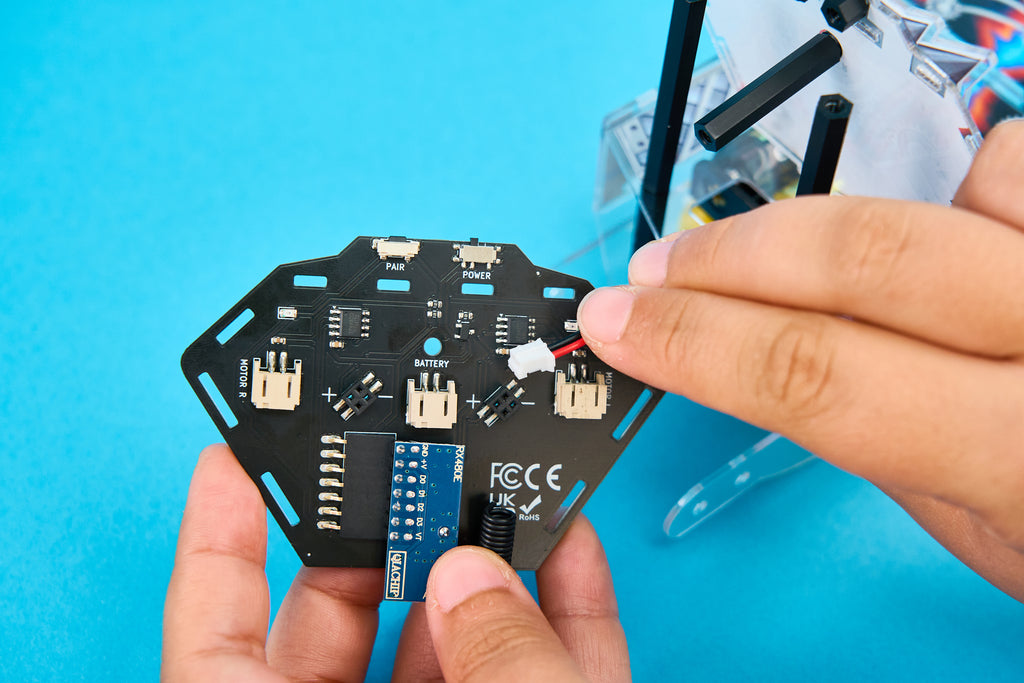

Take the receiver module
and plug it into the pin
headers on the board.

Let’s return to the casings.
Grab these parts:

Follow these steps like a puzzle to put everything together.


As shown in the photo,
take this casing part
and attach it to the rest
of the body. Then, use
the bolts to secure it
to the long casings so
everything stays in place.

Take the PCB and attach it to the front side. Use
one bolt to keep the PCB in place.


The head and body are
all set! Now, let’s move
on to the legs to give
Charlie some movement.

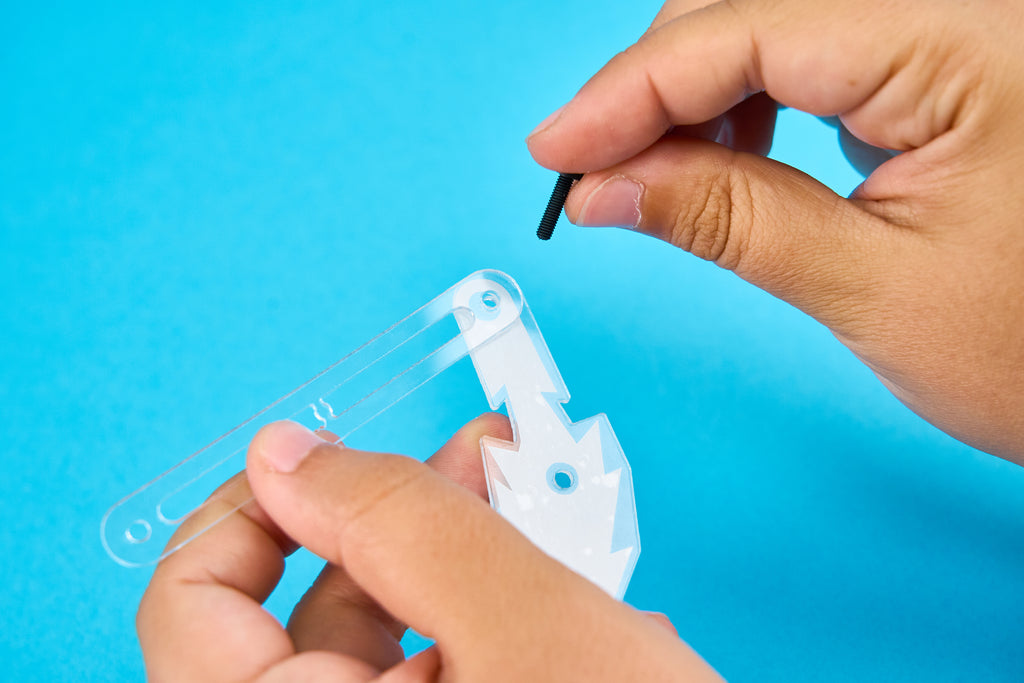
Take one of Charlie’s legs
and a bolt. Insert the bolt
into the leg like this:

Take a medium–sized spacer and use it to fasten the bolt. This time,
place the bolt at the back and the spacer at the front of the leg.


Now, take the small
rectangle parts and
insert them like this:

Next, place this small
casing on top from
the front side.

To keep Charlie’s foot
in place, use the bolt
to secure it tightly.

We’ll add rubber feet to
the bottom of Charlie’s
leg — four feet per leg.

Repeat the same steps
for the other leg.

Now, let’s connect
the legs together.
For this, you’ll need
these components:

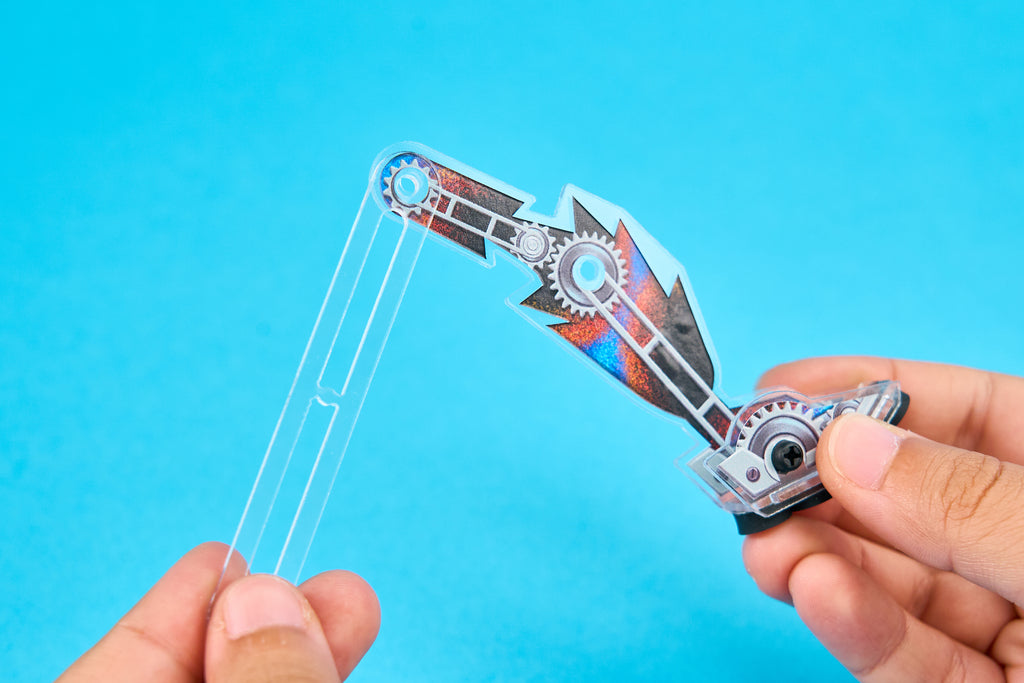
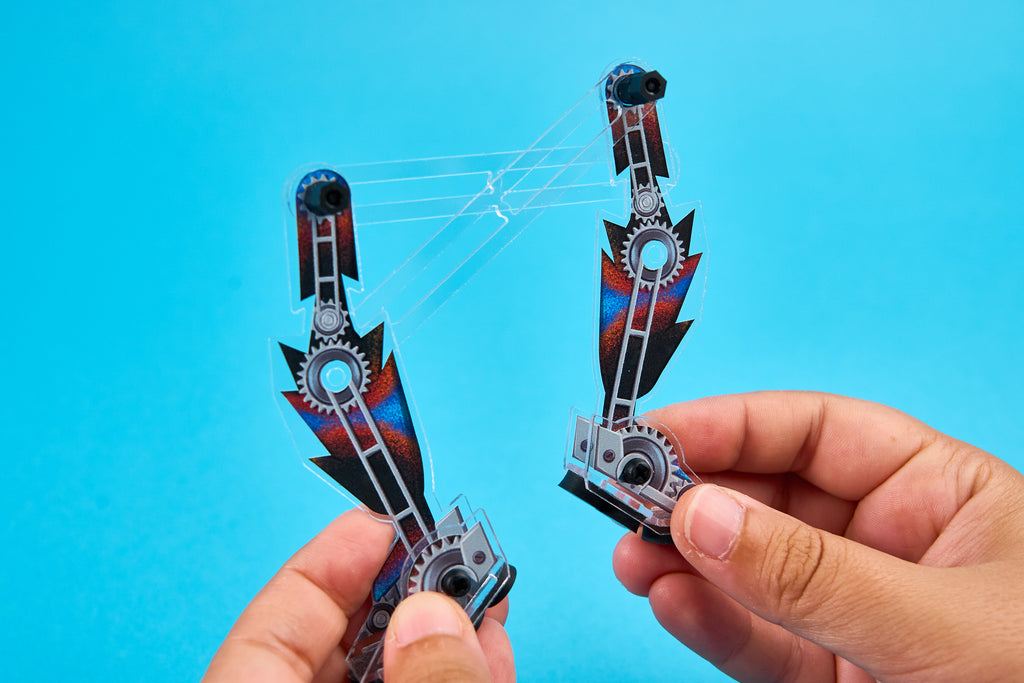
Take the left (front)
leg and this plastic
stick. Position the
stick behind the leg.

Next, insert a bolt
from the back side,
through both casings.
On the front side, secure it with two small spacers.


Here’s what everything
should look like so far:

Now, let’s move on to
the right (back) leg.
For this leg, position
the stick casing in
front of the leg.
Place the bolt at the back and secure it with spacers at the front.


Almost there!
We just need to connect
the legs to each other
and attach them to
the rest of the body.
To do this, you’ll need
these components:


Slide one spacer through
the motor casings like this:

Both the spacer and the rubber piece have holes
that need to line up so you can insert a bolt through
them and keep everything securely in place.


Insert another bolt through the second hole on the inside.


Do the same for
the other side.

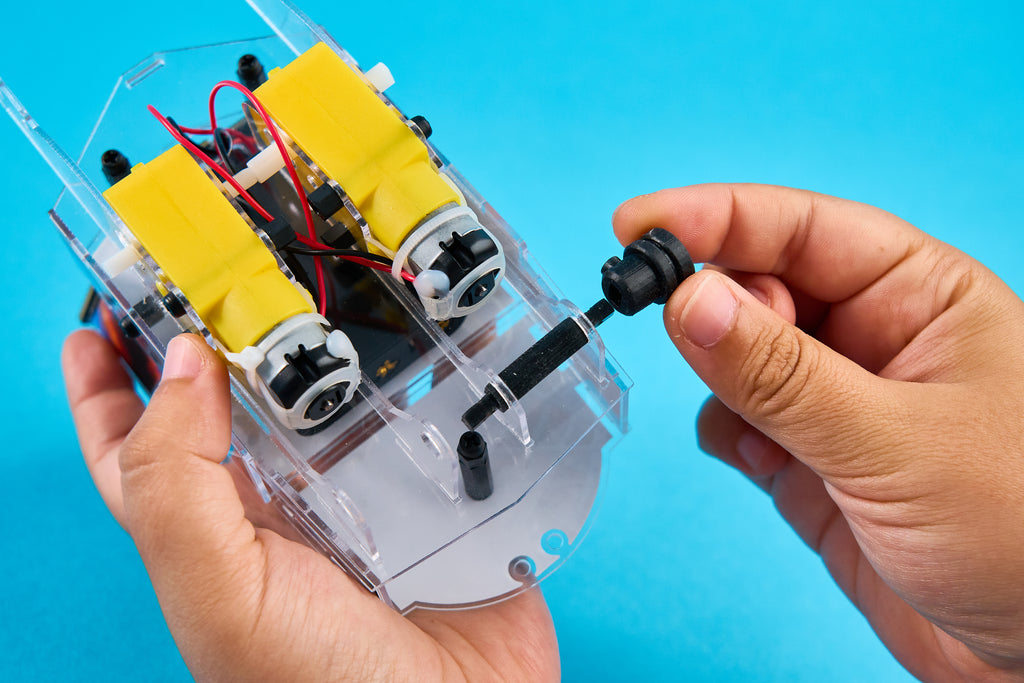
Now, let’s add the
wheels to the motors.

You’ll see the white part
of the motor sticking
out from Charlie’s body.
Attach the wheels to
these white parts.

Next, use the bolt to secure everything in place.


Great job!
Now, let’s return
to the legs.

Here’s how to
correctly connect the
legs on one side.
For a clearer idea of
where everything goes,
here’s another photo:

Take a bolt, position
the legs on the Charlie,
and insert the bolt into
the right leg like this:

Secure it with the
wheel at the back:

Now, align the hole on the left leg with the
rubber piece we just installed:


Grab the bolt and a
screwdriver, and let’s
secure it in place:

Here’s what Charlie
should look like so far:

Repeat the process
on the other side until
Charlie looks like this and
can stand on its own:

But that’s not all — more
legs make your robot
more stable. So, let’s add
two more legs to the front!

We’ll attach two bolts to each leg:


Now, position the leg and
bolts on Charlie like this:

From the inside, use the spacers to secure those two bolts to Charlie.


Repeat this step on the
other side as well:

Don’t forget to use LEDs for Charlie’s eyes. Make sure to connect
the flat side of the LED to the minus (–) side. You can find the
plus (+) and minus (–) signs on the back of the PCB to help you.


To turn it on, simply
click here.

With Charlie, you’ll receive a token that unlocks a special new game
on Bit (a game console sold separately). If you’re not using the
token, you can keep it on Charlie to make sure you don’t lose it.

The final step is to build the controller. First, peel off the
protective foil from both sides of the casings.


Start by taking those fun
stickers and placing them
on the longest acrylic
piece you have left.

Once you’ve customized the casing, connect the PCB
and the green module using the pin headers.
This little module will ensure your controller and
Charlie can communicate with each other.

Next, take the antenna and a round–head screw.
Insert the round–head screw, as shown in the photo, and place
the antenna underneath the screw to keep it securely in place.


If you haven’t already,
it’s time to add the coin
battery to the PCB. Make
sure the + sign is facing up.
Next, place the PCB onto
the customized casing
and secure it with screws.
Ensure the antenna is pointing up and securely in place.
Now, attach the casings to hold everything together. Don’t worry about
which side to place the casing on — there’s only one way it will fit.

Next, let’s move on to the second casing:

Now it’s time to add the
pushbuttons, which
will let you navigate
Charlie easily.

Insert the pushbuttons
into the holes on the
casings. Don’t worry if
they seem tilted — the
next casing we add will
straighten them out.

Now, grab the last casing, along with the bolts and spacers.


Insert the bolts from the front side, and use the screwdriver
to ensure they go through the PCB properly.


On the backside,
add the spacers to
keep everything
securely in place

And there you have
it — your controller!
Press the power button to turn on your controller, as shown in the photo.
Once the controller is on, the LED below the switch will light green.

To turn on the other LED on the controller, simply press
and hold the pushbutton labeled “LED” on the board.

Once both the controller and Charlie are powered
on, use buttons A to D to navigate Charlie.
Have fun exploring!