Let's code!
First, open CircuitBlocks and connect your Wheelson to your computer's USB port.


CircuitBlocks should now say "Wheelson connected".
If CircuitBlocks didn't recognize your Wheelson, please check if the USB cable is plugged in properly and if you are using a working USB port on your computer.
If you still cannot get CircuitBlocks to recognize your Wheelson, reach out to us via email at contact@circuitmess.com.
Let's make your Wheelson’s lights blink
In computer programming, a variable is a storage location that contains a value.
Every variable has a specific name and you can store and change the value of a variable.
Let's create our first variable. Find the section named "Variables" and press the "Create variable..." button.

A new window will appear asking you to name your variable. Let’s name it "blinkTime" and click "OK".

After you save the variable, this will create new variables that you can now use.
They will look like this.

Find the variable “set ‘blinkTime’ to” and drag and drop the block into the drawing area.

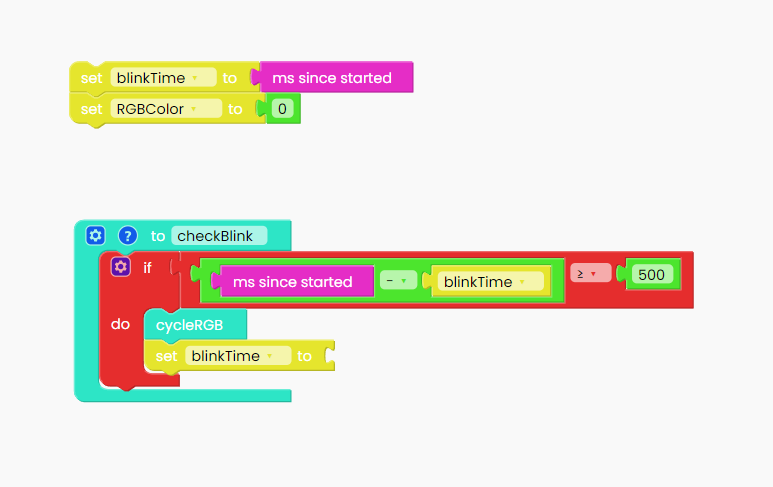
When we create a variable, it's undefined - it has no value. We must set a value for every variable when our computer program starts. That's why you'll need the "set variable" block.
Now you need to define the value that we want to set the variable to.
Find the “Time” section on the left side of the screen and from there take the “ms since started” block.

Take the “ms since started” block and drag it into the empty spot on the right side of the “set” variable.

Now, we have to create a new variable that will help us set the RGB colors to the ones we want. Go back to the “Variables” section on the left side and click on “Create variable…” to create a new variable just like we did a few moments ago. Let’s name this variable “RBGcolor”. Once you enter the name, save your variable.
This will generate a few new variables that we can now play around with. For this step, we need the “set ‘RGBcolor’ to” variable.
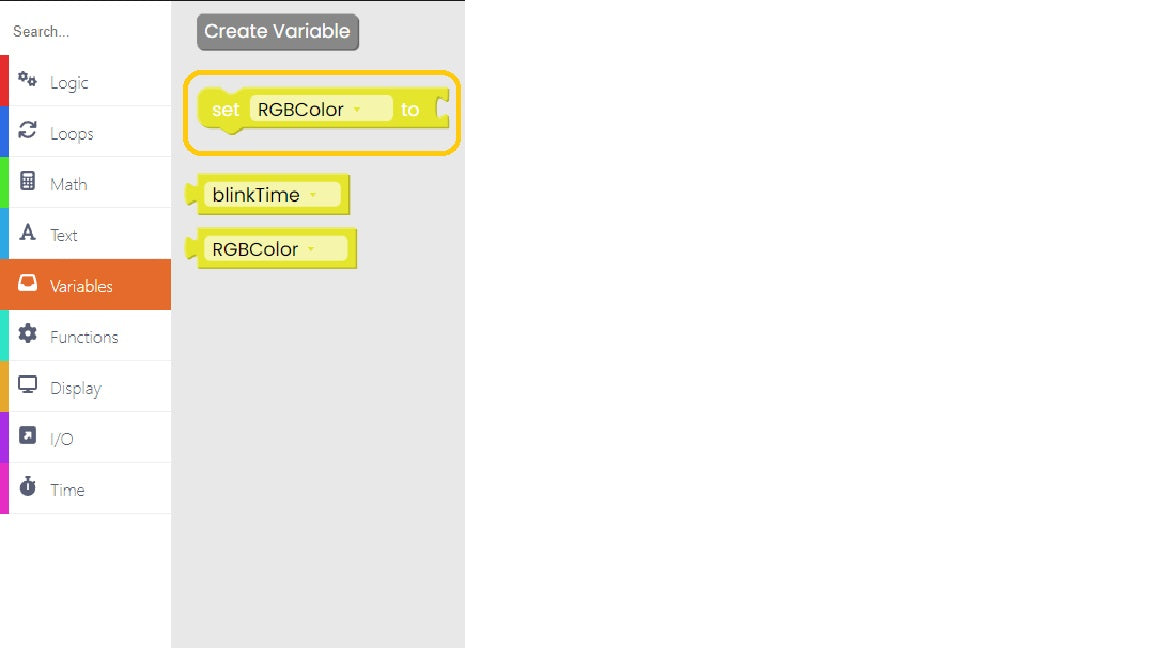
Drag and drop the "RGBColor" variable right below the previous variable. Take a look at the photo below to see how this should look like.

Wheelson’s RGB has 7 different colors and we want to show all of them off.
We’ll start from the first color and move our way to the last one. Our first color will be set to ‘0’ so let’s add that value to the variable.
To do that, go to the "Math" block section and find the first block with numbers. Change the number into 0.

Good job so far!
Now let’s create a function. Find the “Functions” section on the left side of the screen and click on this block:

You can name the function by simply writing down the name in the empty space.
We named it "checkBlink".

Now we’ll define what this function does. Let’s add some logic to it. From the “Logic” section on drag and drop the “if” block inside of the “checkBlink” function.

Add this comparison block from the “Logic” section. Change the comparison symbol in the middle to the greater than or equal to symbol (≥) from the drop-down menu.

Then, from the “Math” section add the block with the ‘-’ symbol between the two numbers.


After that, we’ll go to the “Time” section on the left of the screen and select the “ms since started” block and add it to the left slot of the “Math” block we just dropped.
In the right slot of this same “Math” block, we’ll add the “blinkTime” variable block from the “Variables” section.
Finally, we’ll change the number ‘123’ into ‘500’ to make the lights change color ever 0.5 second. This is how it should look like:

Let’s create a new function called “cycle RGB”. Go to the “Functions” section and click on “Create a Function”. Just like the last time, choose a name for your function - let’s go with “cycleRGB” this time. Click “OK” and the function will show up on the screen.

Let’s add some variables to the function.
From the “Variables” section get the “set ‘RGBcolor’ to” block and drop it in the empty slot of the “cycleRGB” function.

We’ll fill the empty space on the right side of the “set” function with a block from the “Math” section.
Find the “remainder of” block and drop it into the empty slot.
By default, there are some random numbers written in the “remainder of” block.
We’ll switch the number ‘64’ with another block from the “Math” section. Find a block that has number ‘1’ on each side with a ‘+’ symbol in the middle. Then, drag and drop that block in place of the number ‘64’.

Next, go to the “Logic” section and drag and drop the “if, else” block right under the variable we just created.

Let’s add some comparison logic to this new block. From the “Logic” section find a block that compares whether two number values are equal to each other and drag and drop it in place of the “true” value that’s there.

Let’s add the “RGBcolor” variable in the left slot of the comparison logic. Let’s also put the number ’0' on the right side.

Now find the “I/O” section on the left side of the screen. From there drag and drop the “set RGB LED color” block in the empty slot of the “if else” block. Just like this:

Let’s do the same for all of the colors. To add a new check click on the little ‘gear’ icon on the upper left side of the block.

Then, drag and drop the same comparison block as in the previous step and add the “RGBcolor” variable. This time instead of ‘0’ add the value ‘1’ and set the “RGB LED color” to “red” by selecting the red color from the drop-down menu.

Repeat this same process for the remaining 6 colors. With each new block make sure to increase the value by 1 and change the color into a different one. Just like this:

Now let’s go back to our “checkBlink” function. Add the “cycleRGB” function from the “Functions” section to the empty slot of the “if” logic.

Now go to the “Variables” section and drag the “set” variable.
We’ll now add a block from the “Time” section. Look for the “ms since started” block and place it inside the variable.

There’s one final block we need to add. Go to the “Loops” section and drag and drop the “Loop forever” block.
Add the "checkBlink" function inside it.

This is how your sketch should look like in the end:

This sketch will make you Wheelson's RGB light blink in different colors every 0.5 seconds and it will draw the camera on the screen. So, let’s test it out and see if it works!
Click on the Run button and check it out.
If your code was compiled and uploaded successfully, Wheelson's white LED headlights and the RGB light underneath the screen should blink in different colors every 500 milliseconds and you should be able to see the camera on the screen.

Is everything ok? Great, let's move on.